Posted by Chris Iteh
How can you update an Android phone or tablet?
The release of any new Android updates always brings a lot of excitement. Being the most widely used mobile operating system in the world that's to be expected.
Google releases major Android versions on a yearly basis with a lot of new additions.
The latest version Android 7 Nougat was released on August 2016. Marshmallow is 6, Lollipop is 5, and KitKat is 4.4, while 4.3, 4.2 and 4.1 are all named Jelly Bean.
Why Update
Some users however are not aware of the benefits of upgrading their Android OS. You too might right now be asking yourself why you would even want to update.
There's a lot to gain from updating your device. These updates usually come with new features and functionality, updated security, bug fixes, improved performance and increased battery efficiency. All of which help in the smooth running and care of your device.
You need to update your Android OS to the latest version if you want to keep up with the latest features and make the most out of your Android device.
Your device manufacturer normally informs you when an update is available, but these messages can at times be delayed. Moreover, phone makers often fail to put the current version on second-tier or budget phones which is why most of the older versions of the Android OS stick around far more longer than they should.
But in most cases, users themselves are at fault. They usually fail to implement the new updates when it does arrive due to either unwillingness or their inability to do it themselves.
It's my hope that this article will be able to guide you step-by-step on how you can manually update your own Android device yourself.
Getting Starte
Before you start doing any update, I strongly recommend that you first back up your device’s data, such as contacts and photos. Though the upgrade shouldn't affect your data but there is no guarantee to its safety. Something could unexpectedly go wrong with your device, such as a crash. Though there's little chance of that happening.
Also, be sure to check which version of Android you are running before you try to update your device.
Many versions of Android are device-specific. Just because a newer version of Android is out does not mean that it will be available for your device. It’s your device manufacturer that is responsible for rolling out those updates to your device.
In general, an Android phone won't get any more updates if it's more than three years old. If your device is running anything lower than Android 4 Jelly Bean, then unless you've simply never updated the software it's very unlikely that an update will be available as Google probably doesn't support this device any longer.
Your device will only search for updates that are compatible with your device.
But if you want to always stay updated to the latest Android releases, consider getting Google’s own “Pixel” or their older “Nexus” devices. Only Google's Pixel devices are guaranteed to get the latest Android updates in a timely manner, although the latest Samsung and Motorola devices are often not far behind.
After backing up your data, you can then safely do the update without worries. So without much ado, let's get on with it.
Updating Over the Air (OTA)
Updating over the air (OTA) through Wi-Fi is by far the easiest method I recommend as the software file size can be large.
Though there are other methods such as updating with PC and with rooted devices, we'll be concentrating on using over the air.
Below are the steps you should take.
1. Connect your device to Wi-Fi. Do so by swiping down from the top of your screen and tapping the Wi-Fi button.
2. Go into your device’s Settings. On most Android devices, the Settings can be found in the app drawer, or the device’s menu button on the Home screen.
Typically the Settings app will have a cog or spanner logo.
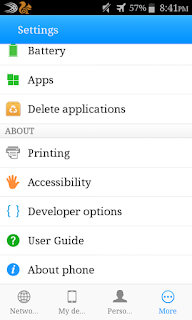
3. Scroll down and look for About Phone or About Tablet, depending on your device. It's located near the bottom of the menu. Tap on it to open its information screen.
On a tablet, you may need to tap the General tab at the top of the screen first.
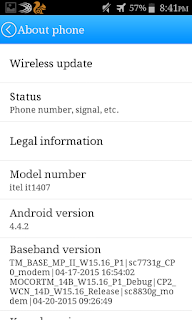
4. Tap System Update which is at the top of the menu. This option may be labeled "wireless update" "Software Update" or "System Firmware Update" depending on the version of Android you're running.
This section of the menu will also detail which version of Android your device is running. It will either be displayed on this screen, or you might have to select 'Software information' to find out.
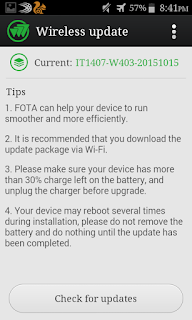
5. Tap Check for "Updates" or "Software Update Check" or similar button. Your device will now check to see if any system updates are available.
Remember: Update availability is dependent on your device’s manufacturer as well as your mobile service provider. New updates may not always be available for all devices.
6. If there is an update available, the update button will appear at the top of the menu. It’s asking you if you wish to install it.
7. Tap Install. The button may also read "Reboot and Install" or "Install System Software". This starts the download and installation process.
For larger updates, this could take a while. That’s why it’s recommended to have your device connected to a Wi-Fi network to avoid going over your data allotment.
8. Wait for the installation to complete. Your phone will automatically reboot when the installation finishes. This will render your device inoperable for a few minutes during the update process.
If you have a tabbed settings menu then this will appear in the 'General' section.
Plug your device into its charger during the installation process to ensure that the battery doesn't run out while the update is being installed. Sometimes mobiles may hang and will not switch on, in this circumstance you have to reboot your device. In the rebooting process all the updated data is erased and your phone is switched on.
What Next
Well there's no next. You've just completed the upgrade. Just sit back enjoy the feel and features of your new android version.
I hope this tutorial helps. Feel free to make comments and do share this info.


Comments
Post a Comment